I finally had a couple of seconds to rub together to try out the mixed-environment Synology backup workflow that I’ve been meaning to get around to, but needed to do some quick updates to some boxes that I have not used in a while. Little did I know that I’d have to postpone it, yet again.
[Update 2017.06.13. For this exercise I’m assuming you have your Synology connected to a router/switch, not directly attached to a computer. If you attach the Synology directly to a computer that is not running DHCP you will get a 169.254.X.Y address, it will not connect to the Internet and these instructions won’t work, I’m afraid.]When you log into the DSM Control Panel, you’ll see a familiar flag connected to the icon, letting you know that there is an update to be made:
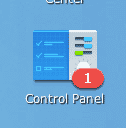
You’ve got updates!
When you click on the update, the control panel will open up and you can see the little flag bounce at you:
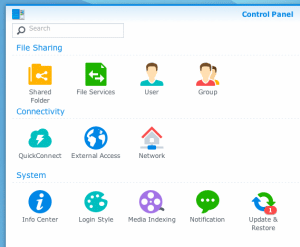
Pick me!
When you click on the Update and Restore icon, what you should see is this:
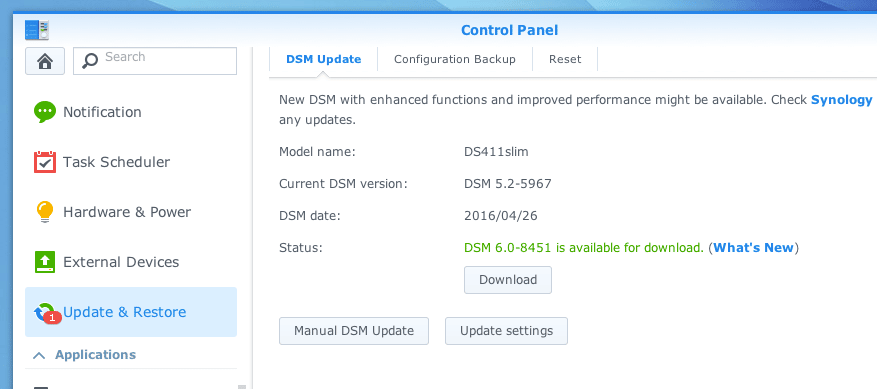
Update at will, ensign.
Instead, sometimes you can get this:

Ah, crap. Now what?!
(Eagle-eyed readers will notice that these last two screenshots are from two different machines. Fear not: it happened with both of them).
Ah, yes. The evil, “Connection failed. Please check your Internet Connection” error. This problem has confounded many a poor soul. Rumor has it that the only people to have successfully beaten this devilish problem are the Ancient Mayans, who also were able to count to 2012 and start over without panicking about the end of the world.
Now before you run screaming to the streets or try to wipe your Synology clean, here are a couple of things you can try.
First, navigate to the control panel if it’s not already showing (that’s the icon I showed up above). Then you want to find the icon labeled “Network.” It looks like a little house sitting on top of a sewer line (and if you know anything about networking, you’ll realize just how appropriate that is):

The screen that pops up will tell you what your network settings are. Most of these should be filled in for you. There is, however, two lines that you need to look at: The Default Gateway and the IPv6 Default Gateway.
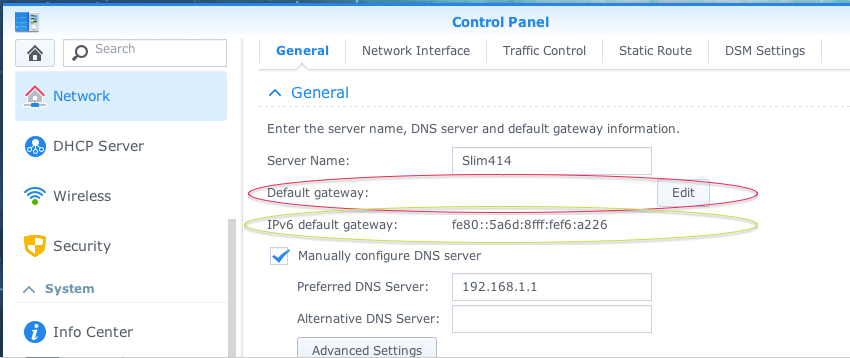
Look at the pretty circles.
You’ll notice a couple of things. First, there is no Default Gateway listed. This is bad. We’ll get to what these things mean in just a moment. For now, let’s fix this.
Default Gateways
Click on the “Edit” button next to the Default Gateway. It should look something like this:
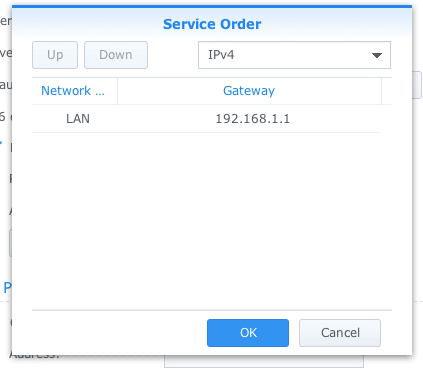
I see you now!
Once the LAN configuration is populated (i.e., it shows up), you can click on OK. The Network control panel should now have this value next to it:
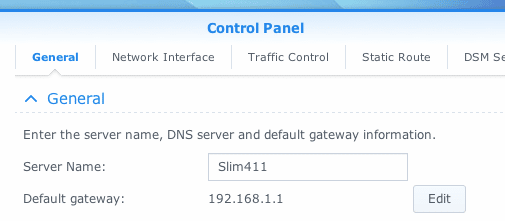
Where you been all my life?
But what happens if it’s not there? Everybody panic!!
Wait, wait. No, that’s not right. Let’s try this instead. Click on the next tab over, the “Network Interface” tab. You’ll see at least one connection listed.
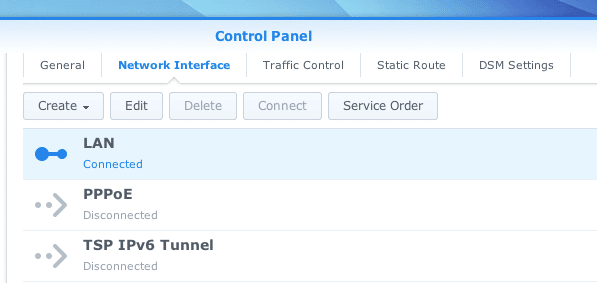
Getting closer…
Go ahead and click on “Edit” with the interface highlighted, as it is in the picture above. Here is where your mileage may vary. If you have your Synology Diskstation set up to get its network configuration from your router, it will have “Get network configuration automatically (DHCP) chosen for you. Personally, I like to have my devices on static IP addresses, so I use the manual configuration option:
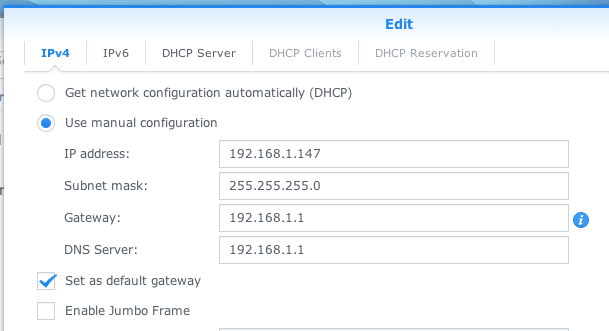
Why do it the easy way? Manual config all the way!
If you didn’t see the default gateway in the previous step, you may want to check to make sure that the checkbox is selected to “set as default gateway.”
One word of caution: Do not put in arbitrary numbers here. These numbers mean something, so if this is all Greek to you then simply keep the “Get network configuration automatically (DHCP)” checked and don’t worry about this stuff.
While we’re on this screen, however, we need to make some changes to the IPv6 settings as well. Fortunately, it’s just one tab over. There’s only one change you have to make here, and it’s an easy one:
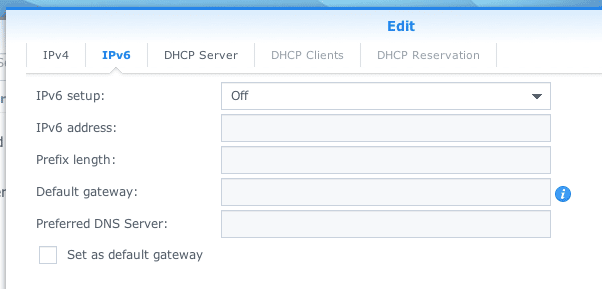
IPv6 is a big bowl of “nope”… for now.
Yup. Just turn IPv6 off.
So what does this stuff mean? The Synology needs to know where to find its way out of the network to see the world (fly! Be free, little Synology!). The Default Gateway is just that – it’s the gateway to the world (online, at least), and the “default” part of it means that this is where the Synology should look if it wants to communicate with the outside world. Since we want to know if Synology has an update that we need, and Synology is in the outside world, this Synology does not know where to go.
The second thing you’ll see is that the IPv6 default gateway does have an address listed. Yes, it’s the fe80::5a6d:8fff:fef6:a226 gibberish that’s next to the words “IPv6 default gateway.” Nifty how that works, eh?
When you turn it off, this default gateway should disappear, and it should look something like this:

Which way did he go, George?
DNS Servers
So, we figured out how to tell the Synology to find devices outside of our home network. This is the “if you don’t know where to go, go here” setting. But once the Synology goes there, then what?
The DNS Server is the place to do that. It’s a server that keeps track of what all these strange numbers mean. They’re the devices that you can ask to find out how to turn google.com into an address that the computers understand, and vice versa.
Speaking of Google, Synology recommends using their DNS server address as the “Preferred DNS Server,” so you should make your system look like this:

The Goobles to the rescue!
Now, in this case, you want to make sure that the numbers match exactly. The periods (full stops) and all. No spaces. You do not have to have an alternative DNS Server, but I put my default gateway as my alternative if, for whatever reason, Google’s DNS server doesn’t respond.
Here Goes Nothing
When I updated my two boxes, I had very different reactions from them. They both gave me the “Could not connect” error. What was even stranger was that on one of the boxes, I did not have to remove the IPv6 setting for it to work – a simple restart after fixing the default gateway and DNS server gave me complete connectivity. The other one, though, was a true PITA.
I tried using Synology’s QuickConnect, and it didn’t work either. Then, I had a bit of a minor success. I was able to turn on the NTP server (that’s the service that lets the Synology know what time it is, according to the US Government’s NIST time servers). Then, miraculously, QuickConnect worked. However, the DSM update continued to give me that error.
Then, about 5 minutes later, the DSM update was giving me what I needed to see:
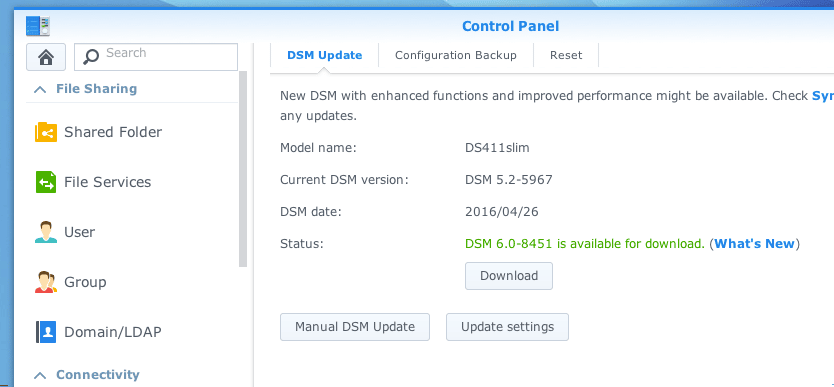
Success!
My best guess is that the time it took for the routing tables to be updated took far longer than either the DSM user interface or my patience expected. I had restarted the box a couple of times in the interim, hoping that it would take, but I think I might have disrupted the population of the tables, and the DiskStation simply restarted the process again. I think that patience is far more useful a tool in this instance than I first thought.
Other Options
Update 2018.06.25. Several readers have written in to say that this has helped them figure out what’s going wrong, and others have offered suggestions for what have helped them fix the issue as well. I have not attempted these, but I’m leaving them here as a courtesy for the reader to attempt, should the above steps fail to resolve the issue.
- Change the admin account password. Every Synology has an “admin” account. Some people have had luck changing the password. It’s not clear why this is an issue; the best I can think of is that newer versions of DSM are requiring a stronger password for allowing incoming/outgoing traffic, but that’s just a guess. In any case, try changing the Synology “admin” account password.
- Modify DNS settings. I do not use the Synology’s DNS settings, so this was not an issue for me. However, another reader is using Synology’s RT1900ac router, and offered the following advice:For the DHCP server, “forward known DNS server” was disabled. Also, IPV6 was setup as AUTO in STATELESS mode. With these settings DSM update could not connect to the internet.Since the issue seems to be DNS related, I changed these two settings: a) I enabled “forward known DNS server”, and b) I changed my IPV6 setup to be stateless DHCPv6. I’m not sure which fixed the problem, but my DSM was immediately able find and install updates.
- Check your time zone/time server (NTP Server). If the date/time setting is out of whack, it can create issues.
- If the Diskstation switches to offline mode after a few seconds, try whitelisting the Synology server in uMatrix. DSM may detect that the browser won’t able to open the pages and switch to offline mode. The Synology update server may be found after that. Try pinging arbitrary addresses to double-check. (Thanks and h/t to Carsten Groß)
As I said, I have not attempted these fixes myself (hence no screenshots), but readers were kind enough to offer additional suggestions and if it helps you in your hour of need, please let me know. YMMV.
Synology’s Take
I contacted Synology’s tech support to find out why this might be happening, since there were no reports in the logs about what had happened during the update process. Here’s what I got, verbatim:
Upon further investigation I see there were some bugs in the past with a disappearing gateway, primarily if the connections were bonded during the upgrade. It was a bug that should be resolved now and should not typically happen.
Now, it is true that one of the Synology DiskStations I was updating had bonded network interfaces, but that was also the one that fixed itself faster. True, I was updating to DSM 6.0 so perhaps the fix was already being applied at that point too. The device that I have been using as an example, however, only had one network interface so there was no link aggregation (or “bonding”) going on.
Even so, after I run the backup tests in a mixed DSM 5.2/6.0 environment, I’ll be needing to update this box to 6.0, so I’m fully expecting to need to refer back to this blog again if/when I lose network connectivity!
Conclusion
I did read some additional messages in the user forums that permissions problems could be to blame for this issue, but it was not so in my case. My gut tells me that is a different issue – the problem here is connecting to the Synology servers in order to determine whether there is an update, and if so which one. Permissions issues would likely only result once it has been determined that an update exists and then issues would arise when trying to save it to a local directory on the Synology. That’s my gut take on it, however, and certainly not something I’d defend to the death.
In any case, I hope that this is somewhat helpful to people (including myself). If this works – or if it doesn’t work – please feel free to leave a comment and let me know. Anything I missed? Please feel free to offer another solution to help out. 🙂
